Ultrasonic sensor with Arduino
Arduino Ultrasonic range sensor
This project will use an ultrasonic range sensor as a proximity meter.

Components
The following components are required for this project
- Arduino Uno R3
- HC-SR04 Ultrasonic Sensor
- 1 kΩ Resistor (x 3)
- Green LED
- Yellow LED
- Red LED
- Piezo buzzer
About this project
This project will use an ultrasonic sensor to detect motion and light different leds and sound a buzzer depending on the distance of an object from the sensor:
We will use Green, Yellow, Red leds and buzzer to signal distance of object as follows:
- Light the GREEN LED if the object is greater than 100cm away from sensor
- Light the YELLOW LED if the object is between 70cm and 100cm away from sensor
- Light the RED LED if the object is less than 70cm away from the sensor and sound the buzzer
How the ultrasonic sensor works
The HC-SR04 device emits an ultrasound at 40kHz which travels through the air and if there is an object or obstacle on its path, the sound will bounce back to the module. Considering the travel time and the speed of the sound is 343m/s the object distance from the sensor can be calculated.
The ultrasonic sensor uses sonar to determine the distance to an object. Here’s what happens:
- The transmitter (trig pin) sends a signal: a high-frequency sound.
- When the signal finds an object, it is reflected
- The transmitter (echo pin) receives it.
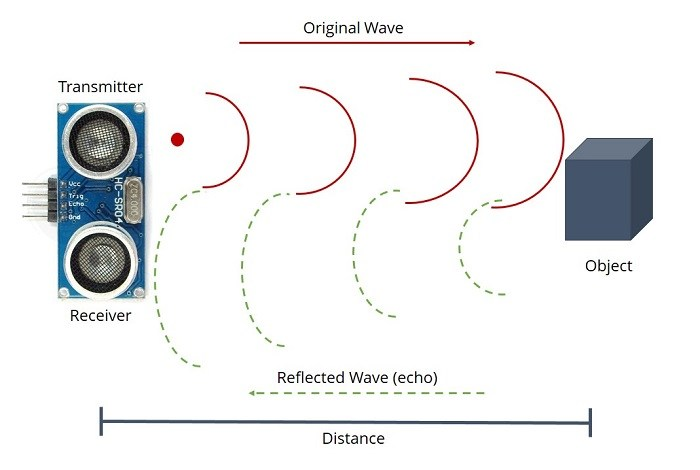
- The time between the transmission and reception of the signal allows us to calculate the distance to an object.
- This is possible because we know the sound’s velocity in the air.
Calculation
  Speed of sound, v                = 343/s
  Expressed in cm per micro second = 0.0343 cm/µs

  Distance = Speed / Time
  Time = Distance / speed

  e.g. Object at 10cm away

  Time = 10 / 0.0343 =  294 µ s (this needs to be halved to cater for the sound performs a round trip - forward and backward)

  Distance = Time * 0.0343 / 2
For example, if the object is 10 cm away from the sensor, and the speed of the sound is 343 m/s or 0.0343 cm/µs the sound wave will need to travel about 294 µ seconds. But what you will get from the Echo pin will be double that number because the sound wave needs to travel forward and bounce backward. So in order to get the distance in cm we need to multiply the received travel time value from the echo pin by 0.0343 and divide it by 2.
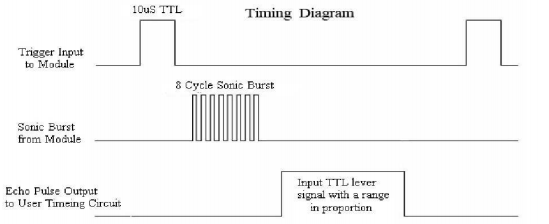
HC-SR04 Timing diagram
-
The circuit needs to supply a short 10uS pulse to the trigger input to start the ranging, and then the module will send out an 8 cycle burst of ultrasound at 40 kHz.
- When the signal emitted hits the target object, it is reflected back to the sensor.
- Ultrasonic Sensors measure the distance to the target by measuring the time between the emission and reception.
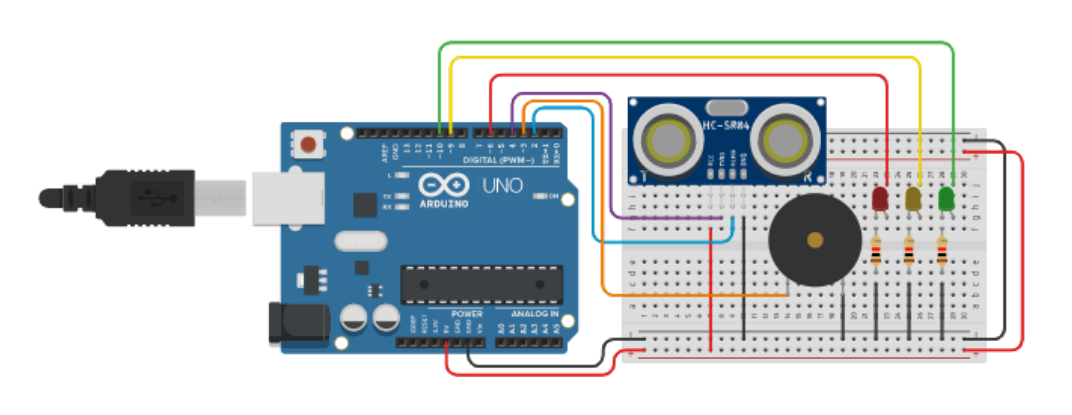
Component diagram
The following shows a breadboard component diagram which will be used for this project.
Code
- The following code snippet can be used (note it’s partially incomplete - you can complete yourself)
int buzzer = 3, ledRed = 6, ledYellow = 9, ledGreeen = 10;
int triggerPin = 4;
int echoPin = 2;

long readTime(int triggerPin, int echoPin){

  // In order for the sensor to send out a pulse the trigger needs to be set low for 2us
  // Then set HIGH for 10us

  pinMode(triggerPin, OUTPUT);
  digitalWrite(triggerPin, LOW);
  delayMicroseconds(2);

  digitalWrite(triggerPin, HIGH);
  delayMicroseconds(10);
  digitalWrite(triggerPin, LOW);
  pinMode(echoPin, INPUT);
  return pulseIn(echoPin, HIGH);
}

void setup() {
  Serial.begin(9600);
  pinMode(buzzer, OUTPUT);
  pinMode(ledRed,OUTPUT);
  pinMode(ledYellow,OUTPUT);
  pinMode(ledGreeen,OUTPUT);
}

void loop() {
  int distance;
  distance = 0.01715 * readTime(triggerPin, echoPin); // From calculation above Distance = 0.0343 / 2 * readTime
  Serial.print("distance: ");
  Serial.print(distance);
  Serial.println("cm");

  if(distance > 100){
    	green();
    }

  if(distance > 70 && distance < 100){
    	yellow();
    }

  if(distance < 70){
    	red();
    }

}

void red(){

    // light the red
    // sound the buzzer
    // delay 100ms
}

void green(){

   digitalWrite(ledGreeen, HIGH);
   digitalWrite(ledYellow, LOW);
   digitalWrite(ledRed, LOW);
   digitalWrite(buzzer, LOW);
   delay(100);
}

void yellow(){
  // light yellow..
}
Resources
- Lookup the data sheet for the HC-SR04 to find more out about its specifications and how to operate.
- Prior to building the circuit for real, we strongly recommend Tinkercad to prototype.
- The project could be extended to display the object distance on an LCD screen