(Tutorial) Interval timer
You should have a minimum understanding of HTML / CSS / JS and preferably completed the recommended courses on Codecademy.
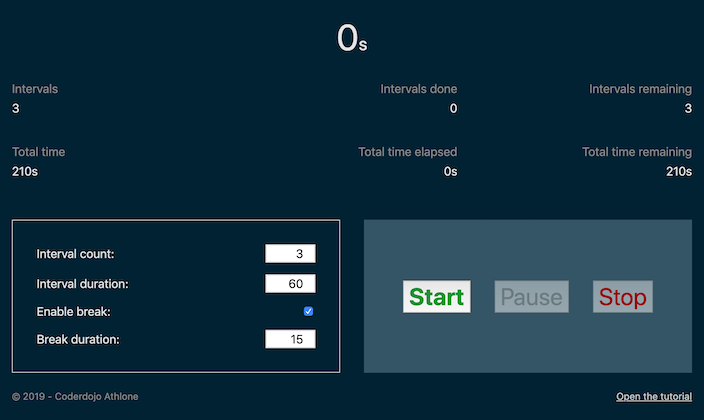
The application built is a sport interval timer. It allows to plan exercise intervals and rest time.
Things to do:
- A
settings formis capturing the timer settings (count,duration,enable breakandbreak duration)- Fields for
count,durationandbreak durationare of type number - Toggling
enable breakshows/hides the input forbreak duration - The checkbox
enable breakis set to false and disabled whencountis equal to1 - The fields values are set to some default values when the app loads
- Fields for
- A
status panelis showing:- The
time elapsedin the current interval - The number of
intervals done - The total
count of intervals - The type of the current interval rest / exercise
- Displays a message “Finish!” when the timer ends
- The
- A set of
controls buttonstostart,pauseandstopthe timer- The
startbutton disables thesettings form, starts the timer and updates thestatus panel - The
pausebutton pauses the timer… (logic so far :D) - The
stopbutton resets the timer to the values set in thesettings formand updates thestatus panel
- The
Key parts
This tutorial will cover:
- How to execute JS code when the page is loaded
- How to write an Immediately Invoked Function Expression (IIFE)
- How to write a ternary expression
- How to add an event listener for button clicks, field input, etc
- How to execute a function at a regular interval
- How to safely set text inside an element
- How to convert a number in a string into a number e.g.
'123'into123and apply minimal validation - How to get the smallest / biggest value in a set of numbers with
Math.min()/Math.max()
All these parts will be described first to allow you to give a try and implement your own version.
How to style an application is not on the scope of this tutorial but the part of CSS used are explained. For more information about CSS grid or flexbox have a look at these fantastic articles:
How to execute JS code when the page is loaded
window.addEventListener('load', () => {
  // code executed when the page is loaded
});
How to write an Immediately Invoked Function Expression (IIFE)
(() => {
// code executed automatically
})();
Read more on this article.
How to write a ternary expression
A ternary expression is written as condition ? when true : when false.
const color = timer.isFinished ? 'green' : 'red';
How to add an event listener for button clicks, field input, etc
<button id="theButton">Start</button>
<input id="theInput"/>
document.getElementById('theButton').addEventListener('click', () => {
  // code executed when the user clicks on the button
});

document.getElementById('theInput').addEventListener('input', () => {
  // code executed when the user types in the input
});
How to execute a function at a regular interval
setInterval(() => {
  // code executed at intervals of at least 1 second
}, 1000); // note: these are milliseconds (1s/1000)
The function setInterval does not give an accurate interval, the code is executed at intervals of at least 1 second. It means it will usually takes longer than 1s before the function is called. Improving the accuracy is not be addressed in the tutorial but feel free to ask one of the web mentors.
Read the MDN official documentation about setInterval and clearInterval.
How to safely set text inside an element
<div id="theElement"></div>
document.getElementById('theElement').textContent = 'The text content';
Setting text using the textContent property is safe and prevents potential Cross-site scripting (XSS) attacks.
Read the MDN official documentation about textContent and innerHTML security risk.
How to convert a number in a string into a number e.g. '123' into 123 and apply minimal validation
parseInt('123'); // 123 as number
parseInt('aaa'); // NaN Not A Number (invalid user input)

// NaN can be tested with isNaN()
isNaN(parseInt('123')); // false
isNaN(parseInt('aaa')); // true
How to get the smallest / biggest value in a set of numbers with Math.min() / Math.max()
While very simple, these functions are great to reduce the clutter and make your code more readable.
const biggest = Math.max(-1, 1, 30, 2); // 30
const smallest = Math.min(-1, 1, 30, 2); // -1
Combined together, it allows to bind a value between a min and a max in one line, that rocks! \m/ (>_<) \m/
const boundBetween5and15 = Math.max(5, Math.min(aNumber, 15))
Don’t hesitate to use the console and break this expression step by step.
Read the MDN official documentation about Math.min and Math.max.
Getting Started
Initial setup
The whole application is implemented using 3 files to keep the demo simpler:
index.cssindex.htmlinterval-timer-app.js
However, feel free to name them differently but don’t forget to update the path.
Start by creating a folder with:
index.css
html,
body {
  height: 100%;
  width: 100%;
  box-sizing: border-box;
  margin: 0;
}

body {
  font-family: -apple-system, BlinkMacSystemFont, "Segoe UI", Roboto, Arial, sans-serif;
  font-size: 1rem;
  padding: 1rem;

  background-color: #023;
  color: #E4E5E6;
  overflow: auto;
}
index.html
The HTML will load the stylesheet and the JS file.
<!DOCTYPE html>
<html lang="en">
<head>
  <meta charset="UTF-8">
  <link rel="stylesheet" href="./index.css">
  <meta name="viewport" content="width=device-width, initial-scale=1, shrink-to-fit=no">
  <title>Interval timer - Coderdojo Athlone</title>
</head>
<body>
  <!--  App markup goes here  -->
  <script src="./interval-timer-app.js"></script>
</body>
</html>
interval-timer-app.js
Note the use of IIFE (see above), not mandatory but good practice
(() => {
  window.addEventListener('load', onLoad);

  function onLoad() {
    // code executed when the page is loaded
  }

  <!--  App JS code goes here  -->

})();
Markup and styles
Let’s first implement a basic version of the UI, with basic styles. The purpose is to have a clear idea of what needs to be done when implementing the JS logic.
Note: all the markup goes in the index.html under <!-- App markup goes here -->.
All elements referenced by JS have an id attribute. ID are not the best ways to access the elements for larger apps. ID must be unique and they cause issues with reusability and scalability (things we don’t worry about in this tutorial).
Settings form
The input type is set to "number" to only allow numbers related characters e.g. 1, 2, 3, -, etc.
Note: this does not prevent the user to enter an invalid number. 123, -123 and -1-2-3 are all accepted.
<div class="settings-form">
  <div class="form-line">
    <label for="intervalCountInput">Interval count:</label>
    <input type="number" id="intervalCountInput" min="1">
  </div>
  <div class="form-line">
    <label for="intervalDurationInput">Interval duration:</label>
    <input type="number" id="intervalDurationInput" min="1">
  </div>
  <div class="form-line">
    <label for="enableBreakInput">Enable break:</label>
    <input type="checkbox" id="enableBreakInput">
  </div>
  <div class="form-line" id="breakDurationInputLine">
    <label for="breakDurationInput">Break duration:</label>
    <input type="number" id="breakDurationInput" min="1">
  </div>
</div>
.form-line {
  display: flex;
  align-items: baseline;
  margin-bottom: 1rem;
}

.form-line:last-of-type {
  margin: 0;
}

.form-line label {
  flex-grow: 1;
  padding-right: .5rem;
}

.form-line input[type="number"] {
  width: 60px;
  text-align: right;
  font-size: 1rem;
}
Controls buttons
<div class="timer-controls">
  <button id="startBtn">Start</button>
  <button id="pauseBtn">Pause</button>
  <button id="stopBtn">Stop</button>
</div>
.timer-controls {
  display: flex;
  align-items: center;
  flex-wrap: wrap;
  justify-content: center;
  box-sizing: border-box;
  padding: 2rem;
  background-color: #356;
}

.timer-controls button {
  font-size: 1rem;
  margin: 0 1rem;
}

#startBtn {
  color: #1f9136;
  font-weight: bold;
}

#stopBtn {
  color: #990000;
}
Status Panel
The status panel is split in two different areas, timer-overview will display the time elapsed in the current interval and timer-additional-info some secondary information.
<div class="timer-status">
<div class="timer-overview">
<div id="timeOverviewMessage">Finish!</div>
<div class="box" id="elapsedInIntervalBox">
<header> </header>
<span id="elapsedInInterval"></span>s
</div>
<div class="box" id="elapsedInBreakIntervalBox">
<header>Break time</header>
<span id="elapsedInBreakInterval"></span>s
</div>
</div>
<div class="timer-additional-info">
<!-- Information about interval -->
<div class="box left-align">
<header>Intervals</header>
<div id="intervals"></div>
</div>
<div class="box">
<header>Intervals done</header>
<div id="intervalsDone"></div>
</div>
<div class="box">
<header>Intervals remaining</header>
<div id="intervalsRemaining"></div>
</div>
<!-- Information about time -->
<div class="box left-align">
<header>Total time</header>
<span id="totalTime"></span>s
</div>
<div class="box">
<header>Total time elapsed</header>
<span id="totalTimeElapsed"></span>s
</div>
<div class="box">
<header>Total time remaining</header>
<span id="totalTimeRemaining"></span>s
</div>
</div>
</div>
.timer-status header {
  color: #888;
  margin-bottom: .5rem;
  font-size: 1rem;
}

.timer-status .box.left-align {
  text-align: left;
}

.timer-overview .box {
  flex: 0 0 50%;
  margin-bottom: 1rem;
}

.timer-overview {
  display: flex;
  align-items: flex-end;
  justify-content: center;
}

.timer-overview .box {
  text-align: center;
  font-size: 1.5rem;
}

#timeOverviewMessage,
#elapsedInInterval,
#elapsedInBreakInterval {
  font-size: 3rem;
}

#timeOverviewMessage,
#elapsedInBreakIntervalBox {
  display: none;
}

#timeOverviewMessage {
  text-align: center;
  flex: 1;
  margin-bottom: 1rem;
}

.timer-additional-info {
  display: flex;
  align-items: flex-end;
  flex-wrap: wrap;
  margin: 0 -1rem;
}

.timer-additional-info .box {
  text-align: right;
  flex: 1 0 33%;
  padding: 1rem;
  margin-bottom: .5rem;
  box-sizing: border-box;
}
Layout
So far you should have the main components of the applications, let’s improve the layout a bit. Place all the components directly inside a div with class="main-container":
<div class="main-container">
  <div class="timer-status">...</div>
  <div class="timer-controls">...</div>
  <div class="settings-form">...</div>
</div>
Note: the order is not relevant.
We will use the CSS grid to apply a simple layout. Have a look at the following rules in the link in the “Key parts” section at the start and try to set you own layout:
grid-gapapplies a gap between the component on the inner sidegrid-template-columnsdeclares the grid columns and their sizegrid-template-areasdeclares the areas arrangement, grouped by rowsgrid-areadeclares an area, must be used inside the selector for the specified area
.main-container {
  display: grid;
  grid-gap: 2rem;
  grid-template-areas: "status" "controls" "settings";
  margin-bottom: 1rem;
}

.timer-status {
  grid-area: status;
}

.timer-controls {
  grid-area: controls;
}

.settings-form {
  grid-area: settings;
}
The block above will stack the components as 3 rows with a gap of 2rem in between. This layout is specially suitable for phones where the screen is narrow.
For larger screens, you need to add CSS media queries (@media) to define when to rearrange the layout.
@media only screen and (min-width: 768px) {
  .main-container {
    grid-template-columns: repeat(2, calc(50% - 2rem / 2));
    grid-template-areas: "status status" "settings controls";
  }
}
The block above will set 2 columns, and the width. The expression for the width may seem complicated but let’s explain it in details:
calc()is a CSS utility to perform calculations e.g.100% - 10px, very powerful!50%the width of one column as there are 22rem / 2is the grid gap value divided between the two columns.
It can be simplified by1rem(but wanted to remind to take in account the gap in the measure of the cell)
Finally, add max-width and margin to the previous block in order to center the grid and set a maximum width.
.main-container {
  max-width: 960px;
  margin: 0 auto;
}
Javascript!
Implementing the logic can be challenging when many parts are involved. The following sections cover how to implement each part progressively in understandable chunks.
Note: all the JS code goes in the interval-timer-app.js.
Modeling the timer’s data
One of the simplest things (and probably the best) to start with is your data. You need to think what needs to be stored and what can be re-calculated.
Example:
- Time elapsed
- Time remaining
- Total time
On the list above, one of the information is redundant, it can be calculated from the 2 others.
The data stored in the timer settings and the current timer will be set as follow:
timer:
totalTimeElapsed: {number}elapsedInInterval: {number}intervalsDone: {number}isBreak: {boolean}isFinished: {boolean}
Arguably, we could also remove isFinished because we can calculate its value with totalTimeElapsed and total time.
timerSettings:
intervalCount: {number}intervalDuration: {number}enableBreak: {boolean}breakDuration: {number}
The data will be stored into objects accessible anywhere in the scope of our app:
-
Create a function to set the
timerdefault values. - Create a function to set the
timerSettings, it should set all properties with the passed arguments. In order for this function to be more convenient to use, it should set the default value when an argument is missing. Javascript has a very convenient way to declare a default value. - Update
onLoad()to call the functions defined above to initialize the default values.
Add the following to interval-timer-app.js:
let
  timer,
  timerSettings;

function resetTimer() {
  timer = {
    totalTimeElapsed: 0,
    elapsedInInterval: 0,
    intervalsDone: 0,
    isBreak: false,
    isFinished: false
  };
}

function setTimerSettings(
  intervalCount = timerSettings.intervalCount,          // declare argument with default value if undefined
  intervalDuration = timerSettings.intervalDuration,
  enableBreak = timerSettings.enableBreak,
  breakDuration = timerSettings.breakDuration
) {
  timerSettings = {
    intervalCount,
    intervalDuration,
    enableBreak,
    breakDuration
  };
}

function onLoad() {
  setTimerSettings(5, 10, true, 5);
  resetTimer();
  // ...
}

// rest of the code
Read more about the syntax used above: property shorthand, default parameter values.
Accessing the elements
The application accesses the elements based on their ID using document.getElementById('theId'). Remember ID must be unique.
The element references will be stored into objects accessible anywhere in the scope of our app:
- Create a function to store the references of all elements in the
settings form. - Create a function to store the references of all
controls buttons. - Create a function to store the references of all elements in the
status panel. - Update
onLoad()to call the functions defined above to initialize the reference objects.
let
  formSettingsFields,
  timerControlsButtons,
  statusPanel;

function initializeTimerSettingsForm() {
  formSettingsFields = {
    intervalCount: document.getElementById('intervalCountInput'),
    intervalDuration: document.getElementById('intervalDurationInput'),
    enableBreak: document.getElementById('enableBreakInput'),
    breakDuration: document.getElementById('breakDurationInput'),
  };
}

function initializeTimerControls() {
  timerControlsButtons = {
    start: document.getElementById('startBtn'),
    pause: document.getElementById('pauseBtn'),
    stop: document.getElementById('stopBtn')
  };
}

function initializeStatusPanel() {
  statusPanel = {
    timeOverviewMessage: document.getElementById('timeOverviewMessage'),

    elapsedInIntervalBox: document.getElementById('elapsedInIntervalBox'),
    elapsedInBreakIntervalBox: document.getElementById('elapsedInBreakIntervalBox'),
    elapsedInInterval: document.getElementById('elapsedInInterval'),
    elapsedInBreakInterval: document.getElementById('elapsedInBreakInterval'),

    intervalsDone: document.getElementById('intervalsDone'),
    intervalsRemaining: document.getElementById('intervalsRemaining'),
    intervals: document.getElementById('intervals'),

    totalTimeElapsed: document.getElementById('totalTimeElapsed'),
    totalTimeRemaining: document.getElementById('totalTimeRemaining'),
    totalTime: document.getElementById('totalTime'),
  };
}

function onLoad() {
  // ...
  initializeTimerSettingsForm();
  initializeTimerControls();
  initializeStatusPanel();
}
Adding event handlers
An event, in the term of JS, is when something occurs on the page. e.g. user interaction click, scroll, etc.
An event handler is the function which is be called in response to an event.
Remember: the reference to the element must be set before calling addEventListener e.g. call addEventListener after initializing the reference object.
The logic of the event handler will be implemented further down. The goal is to make sure the events are properly triggered, use a console.log() or a breakpoint to check.
Controls
- Update the
initializeTimerControlsto add event handlers forstart,pauseandstop.
function initializeTimerControls() {
  // ...
  timerControlsButtons.start.addEventListener('click', startTimer);
  timerControlsButtons.pause.addEventListener('click', pauseTimer);
  timerControlsButtons.stop.addEventListener('click', stopTimer);
}

function startTimer() {
  console.log('start button clicked');
}

function pauseTimer() {
  console.log('pause button clicked');
}

function stopTimer() {
  console.log('stop button clicked');
}
Form
- Update the
initializeTimerSettingsFormto add the event handlers in order to capture when the settings are updated:- Use the event
inputto detect a change of the value in the input field. - Use the event
changeto detect a change of the value in the checkbox field.
- Use the event
Note: Try to replace the input event by change, keydown, keyup or keypress and notice the difference.
function initializeTimerSettingsForm() {
  // ...

  formSettingsFields.intervalCount.addEventListener('input', () => {
    console.log('intervalCount field updated', formSettingsFields.intervalCount.value);
  });

  formSettingsFields.intervalDuration.addEventListener('input', () => {
    console.log('intervalDuration field updated', formSettingsFields.intervalDuration.value);
  });

  formSettingsFields.enableBreak.addEventListener('change', () => {
    console.log('enableBreak checkbox updated', formSettingsFields.enableBreak.checked);
  });

  formSettingsFields.breakDuration.addEventListener('input', () => {
    console.log('breakDuration field updated', formSettingsFields.breakDuration.value);
  });
}
Set form and controls disabled state
Before implementing the logic for the event handlers, you should plan what will be required in those. One of the things required is to change the disabled state. You should create functions in order to avoid code duplication every time you need to change the disabled state of all fields or controls.
Controls
Control’s disabled state needs to be updated independently.
Create a new function setTimerControlsDisabledState to manage the control’s disabled state.
function setTimerControlsDisabledState(start, pause, stop) {
  timerControlsButtons.start.disabled = start;
  timerControlsButtons.pause.disabled = pause;
  timerControlsButtons.stop.disabled = stop;
}
Form
Form field’s disabled state will always be the same value except for enableBreak. The field enableBreak needs to stay disabled when timerSettings.intervalCount equals 1.
Create a new function setFormDisabledState to set all field’s disabled state.
function setFormDisabledState(disabled) {
  formSettingsFields.intervalCount.disabled = disabled;
  formSettingsFields.intervalDuration.disabled = disabled;
  formSettingsFields.enableBreak.disabled = disabled || timerSettings.intervalCount === 1;
  formSettingsFields.breakDuration.disabled = disabled;
}
Implementing timer ticking logic
The purpose of this section is to implement the ticking scheduling part only. The full timer ticking logic is more complex and is addressed separately further down.
Create three functions:
startTimerTickstarts the timer ticking usingsetIntervalandonTimerTickand keep theintervalIDfor later cancelling.stopTimerTickcancel the interval callingonTimerTick.onTimerTickfunction being called bysetInterval, this is where the timer’s logic will be implemented.
function startTimerTick() {
  timer.intervalId = setInterval(onTimerTick, 1000);
}

function stopTimerTick() {
  clearInterval(timer.intervalId);
}

function onTimerTick() {
  console.log('tick!');
}
Implementing event handlers’ logic
In this section you should start to put together different parts implemented until now.
Controls
The controls event handlers should be updated to prevent unexpected state.
- Update the
startTimerfunction:- call
startTimerTick. - call
resetTimerwhen the timer is marked asisFinished. - disable the fields in
settings form. - disable the
startbutton and enablepauseandstop.
- call
- Update the
pauseTimerfunction:- call
stopTimerTick. - enable the
startbutton and disablepause(stopremains enabled).
- call
- Update the
stopTimerfunction:- call
stopTimerTick. - reset the timer by calling
resetTimer. - enable the fields in
settings form. - enable the
startbutton and disablepauseandstop.
- call
function startTimer() {
  setFormDisabledState(true);
  setTimerControlsDisabledState(true, false, false);

  if (timer.isFinished) {
    resetTimer();
  }

  startTimerTick();
}

function pauseTimer() {
  setTimerControlsDisabledState(false, true, false);

  stopTimerTick();
}

function stopTimer() {
  setFormDisabledState(false);
  setTimerControlsDisabledState(false, true, true);

  stopTimerTick();
  resetTimer();
}
You should now be able to start and pause/stop the ticking.
Form
The “Key parts” section explains how to convert a string to number, how to detect invalid numbers with isNaN and how to apply min / max bounds. Implementing the settings form event handlers will require a minimum of data validation.
- Verify the input
- Convert it to a number
- Apply min / max bounds to gently prevent the user starting a timer with
999999999999999999999999999999intervals :D
Create a new function getNumberInBoundsOrDefault which takes the value to validate with its minimum, maximum and default (when invalid).
function getNumberInBoundsOrDefault(value, min, max, def = 1) {
  const valueAsNumber = parseInt(value);
  return isNaN(valueAsNumber) ? def : Math.max(min, Math.min(valueAsNumber, max));
}
The function above will be used to validate data entered for intervalCount, intervalDuration, breakDuration.
Create a new function setBreakDurationLineDisplay which takes a boolean value. It should apply/clear the display to breakDurationInputLine.
function setBreakDurationLineDisplay(displayed) {
  const breakDurationInputLineElt = document.getElementById('breakDurationInputLine');
  breakDurationInputLineElt.style.display = displayed ? null : 'none';
}
Update the event handlers in initializeTimerSettingsForm to:
- call
setTimerSettingswith the updated value after validation. - show / hide
#breakDurationInputLinebased onenableBreakvalue. - show / hide
#breakDurationInputLinebased onintervalCountvalue (no break when value equals 1).
Note: lastUserSetEnableBreak is used to keep track of the last value set by the user in order to restore it when intervalCount is not equal to 1.
function initializeTimerSettingsForm() {
  const oneDayInSeconds = 60 * 60 * 24;
  let lastUserSetEnableBreak = timerSettings.enableBreak;

  // ...

  formSettingsFields.intervalCount.addEventListener('input', () => {
    const
      intervalCount = getNumberInBoundsOrDefault(formSettingsFields.intervalCount.value, 1, 999),
      hasOneInterval = intervalCount === 1,
      hasBreak = hasOneInterval ? false : lastUserSetEnableBreak;

    formSettingsFields.enableBreak.disabled = hasOneInterval === true;
    formSettingsFields.enableBreak.checked = hasBreak;

    setBreakDurationLineDisplay(hasBreak);

    setTimerSettings(intervalCount, undefined, hasBreak);
  });

  formSettingsFields.intervalDuration.addEventListener('input', () => {
    setTimerSettings(undefined, getNumberInBoundsOrDefault(formSettingsFields.intervalDuration.value, 1, oneDayInSeconds));
  });

  formSettingsFields.enableBreak.addEventListener('change', () => {
    const enableBreak = formSettingsFields.enableBreak.checked;

    lastUserSetEnableBreak = enableBreak;
    setBreakDurationLineDisplay(enableBreak);
    setTimerSettings(undefined, undefined, enableBreak);
  });

  formSettingsFields.breakDuration.addEventListener('input', () => {
    setTimerSettings(undefined, undefined, undefined, getNumberInBoundsOrDefault(formSettingsFields.breakDuration.value, 1, oneDayInSeconds));
  });
}
The value undefined is used above to prevent repeating the matching timerSettings values. Undefined values will be replaced with the defaults defined in the setTimerSettings function.
Display the data
Form
Update the function initializeTimerSettingsForm to set the initial values of timerSettings.
function initializeTimerSettingsForm() {
  // ...

  formSettingsFields.intervalCount.value = timerSettings.intervalCount;
  formSettingsFields.intervalDuration.value = timerSettings.intervalDuration;
  formSettingsFields.enableBreak.checked = timerSettings.enableBreak;
  formSettingsFields.breakDuration.value = timerSettings.breakDuration;

  // ...
}
Remember: the reference to the element must be set before setting the value e.g. set the value after initializing the reference object.
Status
In this section, you will implement the part to display the information about the timer.
Note: both elements #timeOverviewMessage and #elapsedInBreakIntervalBox have display: none; to hide them by default.
Create a new function updateInfo to manage the display of the information:
- Show
#elapsedInIntervalBoxwhen on NOT on break, hide when on break. - Show
#elapsedInBreakIntervalBoxwhen on break, hide when not. - Show
#timeOverviewMessagewhen timer is finished, hide until then. - Display the value from
timer.elapsedInIntervalin#elapsedInIntervalBoxor#elapsedInBreakIntervalBoxbased on “on break” value. - Display the value for:
intervalsDoneintervalsRemainingintervalstotalTimeElapsedtotalTimeRemainingtotalTime
You will need to compute totalTime and totalTimeRemaining.
- Without break, it is simply
intervalCount * intervalDuration - With break, you need to add the value
breakDurationfor breaks.
Test withintervalCountset to different values, but make sure to test with1.
This function will require you to change the value of timer few times to cover all possibilities. Ideally, it should be done as part of a test script, we should cover how in a more advanced tutorial.
It is tempting to implement onTimerTick and then updateInfo but debugging would be harder. Debugging is easier when the debugged part is not impacted by too many outside factors.
function updateInfo() {
  statusPanel.timeOverviewMessage.style.display = timer.isFinished ? 'block' : null;
  statusPanel.elapsedInIntervalBox.style.display = timer.isFinished || timer.isBreak ? 'none' : null;
  statusPanel.elapsedInBreakIntervalBox.style.display = !timer.isFinished && timer.isBreak ? 'block' : null;

  if (timer.isBreak) {
    statusPanel.elapsedInBreakInterval.textContent = timer.elapsedInInterval;
  } else {
    statusPanel.elapsedInInterval.textContent = timer.elapsedInInterval;
  }

  const {
      intervalCount, intervalDuration, enableBreak, breakDuration
    } = timerSettings,
    totalTime = (intervalCount * intervalDuration) + (enableBreak ? Math.max(intervalCount - 1, 1) * breakDuration : 0);

  statusPanel.intervalsDone.textContent = timer.intervalsDone;
  statusPanel.intervalsRemaining.textContent = timerSettings.intervalCount - timer.intervalsDone;
  statusPanel.intervals.textContent = timerSettings.intervalCount;
  statusPanel.totalTimeElapsed.textContent = timer.totalTimeElapsed;
  statusPanel.totalTimeRemaining.textContent = totalTime - timer.totalTimeElapsed;
  statusPanel.totalTime.textContent = totalTime;
}
Read more about the syntax used above: destructuring assignment.
Update now all event handlers of the settings form to call updateInfo after they update the timer settings.
Implement the timer ticking logic
The function onTimerTick probably hold the most complex part of the application. Let’s break the logic into plain english first:
- There are two interval durations (normal / break)
- The type of the interval (normal / break) is defined by the value set in
timerSettings.enableBreakandtimer.isBreak - The current interval duration is defined by the value set in
timerSettings.intervalDurationortimerSettings.breakDurationbased ontimer.isBreakvalue - Every tick (except last), the
timer.totalTimeElapsedshould be incremented - Keep track of the elapsed time in the current interval with
timer.elapsedInInterval - Keep track of the completed intervals with
timer.intervalsDone - Reset the value of
timer.elapsedInIntervalwhen the interval is over - Inverse the value of
timer.isBreakwhen the interval is over and iftimerSettings.enableBreakistrue - Set the value of
timer.isFinished - If
timer.isFinishedistrue- disable
pauseandstopbuttons - enable the settings form
- call
stopTimerTick
- disable
- Update the timer values by calling
updateInfo
function onTimerTick() {
  const
    isBreak = timerSettings.enableBreak && timer.isBreak,
    currentIntervalDuration = isBreak ? timerSettings.breakDuration : timerSettings.intervalDuration;

  if (timer.elapsedInInterval < currentIntervalDuration) {
    timer.elapsedInInterval++;
  } else {

    if (!timer.isBreak) {
      timer.intervalsDone++;
    }

    timer.isBreak = timerSettings.enableBreak ? !timer.isBreak : false;
    timer.isFinished = timer.intervalsDone === timerSettings.intervalCount;

    if (!timer.isFinished) {
      timer.elapsedInInterval = 1;
    }
  }

  if (timer.isFinished) {
    setTimerControlsDisabledState(false, true, true);
    setFormDisabledState(false);
    stopTimerTick();
  } else {
    timer.totalTimeElapsed++;
  }

  updateInfo();
}
Wrapping up
You did it! or just scrolled up to here ;)
Hopefully this tutorial helped you understand some of the basic concepts e.g. event handlers, the Math API, intervals etc but also how to break a problem into small digestible chunks.
We welcome feedback on how we could improve this tutorial so feel free to share your thoughts with one of the web mentors.
Keep on learning!
Full example
See the full example with code sandbox in CodePen.
See the Pen (Tutorial) Interval timer by Marc Ed Raffalli (@marc-ed-raffalli) on CodePen.